Last updated: March 2026 — Written by Sébastien
Google Maps handles over 5 billion API requests per day (Alphabet Q1 2024 earnings). More than 5 million apps and websites depend on it. And the whole Maps division brought in roughly $11.1 billion in 2023 alone, according to Morgan Stanley estimates.
Huge numbers. But most people trying to get a Google Maps API key don't care about any of that — they just want the thing to work. And then they want to know what it'll cost them.
Problem is, Google changed the entire pricing model in March 2025. That comfortable $200 monthly credit everyone relied on? Scrapped. Replaced by a confusing per-SKU free tier system that still trips people up a year later. I've watched developers in Reddit threads argue about what's actually free now. The answer depends on which APIs you're using, which is... not great.
So here's what this guide actually covers: how to create your google maps api key from scratch, what the 2026 pricing really looks like (with dollar amounts, not vague "contact sales" nonsense), how to lock down your key so some stranger doesn't run up your bill, and when the API stops being the right tool for the job. That last part matters more than most guides will tell you.
- What Is a Google Maps API Key?
- How to Get a Google Maps API Key (Step-by-Step)
- Google Maps API Key Pricing in 2026
- Is the Google Maps API Key Free?
- How to Secure Your Google Maps API Key
- Google Maps API Types: Which APIs to Enable
- Common API Key Issues (And How to Fix Them)
- When the Google Maps API Isn't Enough
- Integrating in Popular Frameworks
- Frequently Asked Questions
What Is a Google Maps API Key (And Why Do You Need One)?
Think of it as a password that also functions as your billing address. It's a string of characters that tells Google three things: who you are, what project you're running, and where to send the invoice.
You need one for four reasons, and none of them are optional.
Authentication — Google won't serve a single map tile without a valid key. Try loading the Maps JavaScript API without one and you'll get a grey box with an error overlay. That's it. No key, no maps.
Billing — Your google cloud api key ties directly to your payment method. Every API call gets logged against it. Even if you're on the free tier, Google tracks everything.
Quotas — There are over 200 million business listings on Google Maps (Google, 2024). 73% of US websites use the Google Maps API in some capacity (ElectroIQ, 2024). Google uses your key to make sure no single project hogs the system. Hit your quota? Requests start failing.
Security — You can restrict which websites, IP addresses, and APIs your key works with. Skip this and anyone who finds your key can use it. I'll get into why that's a bigger deal than it sounds in the security section.
Roughly 2.2 billion people use Google Maps every month (SimilarWeb, 2025). If your website or app involves locations in any way, you need an API key. Period.
How to Get a Google Maps API Key in 2026 (Step-by-Step)
Whole thing takes maybe 10 minutes. Closer to 7 if you've done it before.
Step 1 — Create a Google Cloud Platform Account
Go to console.cloud.google.com. Sign in with a regular Google account. New to Google Cloud? You'll get a $300 trial credit valid for 90 days — that's separate from the Maps free tier, and it works for all GCP services, not just Maps.
Quick step. Moving on.
Step 2 — Create a New Project
Top of the console, there's a project dropdown. Click it. "New Project." Give it a name you'll actually recognize later. (I've seen people name theirs "test" and then wonder which "test" project has their production key six months later.)
One project can hold multiple API keys, and most setups only need one project. Keep it simple.
Step 3 — Enable the Maps APIs You Need
Left sidebar: APIs & Services > Library. Search for "Maps" and you'll see a wall of options. Resist the urge to enable everything — each active API is a potential billing line item.
Here's what's available and what each one actually does:
| API | What It Does | Typical Use Case |
|---|---|---|
| Maps JavaScript API | Interactive, zoomable maps in browsers | Store locators, real estate sites |
| Static Maps API | Flat map images via URL | Email footers, printed receipts |
| Maps Embed API | Simple iframe embeds | Contact pages (completely free) |
| Geocoding API | Convert addresses to lat/lng and back | Data enrichment, address verification |
| Directions API (Legacy) | Calculate routes between points | Delivery apps, navigation |
| Routes API | Advanced routing with traffic awareness | Fleet management, logistics |
| Places API (New) | Search businesses, get details | Lead gen, local business search |
| Distance Matrix API (Legacy) | Travel time grids between multiple points | Service area planning |
Click "Enable" on the ones you need. That's it. You can always add or remove APIs later.
Step 4 — Set Up Billing
Billing in the console menu. Link a billing account or create one. Credit card required.
Now — this is the part that confuses people. Google used to give every Maps Platform account a flat $200/month credit. Universal. Simple. Since March 2025, that's gone. Replaced by per-SKU free tiers I'll break down in the pricing section. But the key thing here: billing MUST be enabled or your API key won't function. Even if you never plan to exceed the free tier. Google wants a card on file regardless.
(Yeah. Bit of a trust fall.)
Step 5 — Generate Your API Key
Navigate to APIs & Services > Credentials. Hit "Create Credentials" at the top. Pick "API key."
Your google maps api key appears on screen. Copy it. Store it somewhere safe — a password manager, an environment variable, whatever you use. Do NOT commit it to a public GitHub repo. Seriously. I'll explain why in a minute.
Step 6 — Restrict and Secure Your Key
This isn't optional. Don't close that tab.
Click "Edit API key." Under Application restrictions, select "HTTP referrers" and type in your domain (*.yourdomain.com/*). Under API restrictions, check "Restrict key" and select only the APIs you actually enabled in Step 3.
Save.
An unrestricted key sitting in client-side JavaScript is basically an open credit card. Google's own API key security best practices say never to expose keys without restrictions. And there are real-world horror stories. I've read posts on Stack Overflow from devs who found out their key was scraped from a public repo and racked up $2,000+ in unauthorized charges before they noticed. Over a weekend.
Don't learn this lesson the hard way.
Google Maps API Key Pricing in 2026: What You'll Actually Pay
Everyone scrolls to this section first. I get it.
The New Free Tier System (Post-March 2025)
The old $200 monthly credit — the one that covered roughly 28,400 dynamic map loads per month (StoreLocatorWidgets, 2025) — is dead. In its place, Google introduced free usage thresholds for each individual SKU, based on tiers:
| Tier | Free Calls/Month per SKU | Example SKUs |
|---|---|---|
| Essentials | 10,000 | Geocoding, Static Maps, Dynamic Maps |
| Pro | 5,000 | Directions, Distance Matrix |
| Enterprise | 1,000 | Address Validation, Routes Preferred |
Map Tiles API is the exception — 100,000 free calls/month. And Maps Embed API plus mobile SDKs remain completely free, no cap.
Is the new system better? Depends. If you only use one or two APIs lightly, probably yes. If you were mixing five different APIs and the $200 credit covered all of them? You might be paying more now. One store locator platform documented the impact pretty clearly: their users went from about 25,000 free monthly loads under the old credit to just 10,000 under the new Essentials tier — a 60% reduction in free usage overnight.
Pricing by API Category
Once you exceed the free tier, here's the damage:
| API | Cost per 1,000 Requests | Free Tier | Category |
|---|---|---|---|
| Dynamic Maps | $7.00 | 10,000/mo | Essentials |
| Static Maps | $2.00 | 10,000/mo | Essentials |
| Street View | $14.00 | 10,000/mo | Essentials |
| Geocoding | $5.00 | 10,000/mo | Essentials |
| Directions | $5.00–$10.00 | 5,000/mo | Pro |
| Places (Text Search) | $2.83–$6.50 | Varies | Essentials/Pro |
| Places (Details) | $5.00–$17.00 | Varies | Pro/Enterprise |
These numbers add up fast if you're not watching. A delivery company documented by Radar.com was spending $8,000 per month on Google Maps API calls alone. Not a Fortune 500. A regular delivery business.
Use Google's official pricing calculator to estimate your own costs before you commit. And for a deeper breakdown with alternative cost scenarios, we put together a Google Maps API pricing calculator that compares API costs against other methods.
Real Cost Scenarios
Small site, under 10K map loads/month — Free. The Essentials tier covers it and you won't pay a cent.
Medium traffic, around 100K loads/month — Budget $500 to $700/month after free tier deductions. More if you're also using Geocoding or Directions heavily.
Enterprise, 1M+ requests/month — $5,000+/month. Easy. And that's before Places API calls, which are the expensive ones at $17 per thousand for detailed lookups.
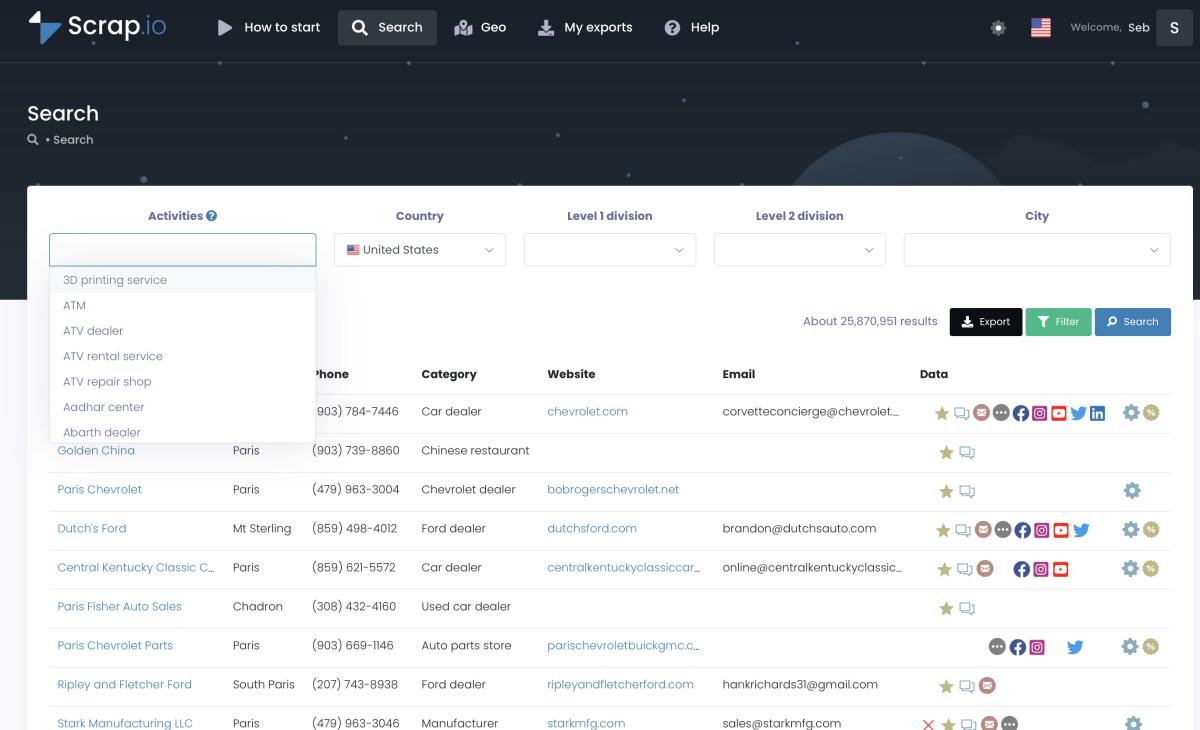
Here's something the pricing pages don't highlight: 74% of Google Maps users are small businesses with fewer than 50 employees (LoopEx Digital, 2026). Most of them will stay comfortably within the free tier. But if you're pulling business data at scale through the Places API — building lead lists, scraping business info, doing market research — the costs spiral fast.
If you're using Google Maps API to extract business data, keep in mind the Places API caps you at 120 results per query and doesn't include email addresses. Platforms like Scrap.io let you access the same Google Maps business data — including emails, phone numbers, and social profiles — with a free trial and 100 free leads.
Is the Google Maps API Key Free?
Yes and no. (Mostly yes, if you're small.)
The key itself costs nothing to create. Billing needs to be enabled — you'll hand over a credit card — but Google won't charge you unless you exceed the free tier. For Essentials SKUs, that's 10,000 calls per month. For a basic website with an embedded map on the contact page? You could run for years without paying Google a dime, especially if you use the Maps Embed API, which has zero usage cap.
Where "free" gets tricky: if you need the Places API for business data, or you're making thousands of geocoding calls for an app, the free tier evaporates quickly. Under the old system, you had one number to track — $200 of credit. Now you need to monitor each API individually in the Cloud Console.
And if you stumble across tutorials mentioning "google maps api key free without billing" — those are outdated. Since 2018, a payment method is required even for free-tier usage. No billing account, no working key. For testing, there's no separate "test mode" — your google maps api key for testing is the same key. Just stay under the limits.
How to Secure Your Google Maps API Key (Best Practices)
Leaked keys cost real money. Here's the short version of how not to get burned.
Application Restrictions
Web apps: set HTTP referrer restrictions so only your domain(s) can use the key. Server-side apps: use IP address restrictions instead. Mobile apps get Android package name or iOS bundle identifier restrictions. Pick the right one for your setup.
API Restrictions
Only allow the APIs you've actually enabled. If your project uses Maps JavaScript API and Geocoding, don't leave Places, Directions, and twelve other APIs open on the same key. Every extra API is another surface for abuse.
Environment Variables & Backend Storage
Hardcoding your key in client-side JavaScript that ships to every visitor's browser? That's how keys get stolen. Store it in an environment variable on your server:
export GOOGLE_MAPS_API_KEY="your-key-here"Reference it in backend code. For Maps JavaScript API — which does require a client-side key — that's exactly why referrer restrictions exist. They're your safety net.
A quick search on GitHub for exposed Google Maps API keys returns thousands of results. Some of those keys still work. Don't add yours to the pile. Google's API key security guide covers additional hardening steps for production.
Monitoring & Alerts
Set billing alerts in the Cloud Console. You pick the threshold — $10, $50, $100, whatever makes sense for your project. Check the API dashboard at least weekly for traffic spikes you don't recognize. Catching abuse early is the difference between a $20 mistake and a $2,000 one.
Google Maps API Types: Which APIs Should You Enable?
Google Maps Platform isn't one API — it's a whole ecosystem. Picking the wrong combination wastes money. Picking too many wastes more.
| API | Description | Use Case | Tier | Free Quota/mo |
|---|---|---|---|---|
| Maps JavaScript API | Interactive browser maps | Store locators, real estate | Essentials | 10,000 |
| Static Maps API | Map images via URL | Emails, reports | Essentials | 10,000 |
| Maps Embed API | Simple iframe embed | Contact pages | Free | Unlimited |
| Geocoding API | Address ↔ coordinates | Data validation, enrichment | Essentials | 10,000 |
| Routes API | Advanced directions & ETA | Logistics, fleet mgmt | Pro/Enterprise | 5,000/1,000 |
| Places API (New) | Business info search | Lead gen, local discovery | Varies | Varies |
| Distance Matrix API (Legacy) | Travel time grids | Service area calc | Pro | 5,000 |
| Street View Static API | 360° imagery | Real estate, virtual tours | Essentials | 10,000 |
For a deeper dive, we wrote a complete Google Maps API guide covering every API in detail. And if you're specifically working with address-to-coordinate conversion, the geocoding API guide and reverse geocoding guide are worth bookmarking.
Common Google Maps API Key Issues (And How to Fix Them)
Stuff breaks. Usually it's one of these:
| Problem | Likely Cause | Fix |
|---|---|---|
| Key not working at all | Required API not enabled | APIs & Services > Library > enable the specific API |
| "This API project is not authorized" | Key restrictions too tight or wrong referrer | Double-check referrer URLs and IP restrictions |
| Map shows "For development purposes only" | Billing not linked | Add billing account to your project |
| Quota exceeded errors | Too many requests in billing period | Check quotas in Console, request increase if needed |
| CORS errors on API calls | Browser hitting API directly | Route requests through your backend |
| Grey tiles, nothing loads | Wrong key or JS API disabled | Verify key is correct + Maps JavaScript API is enabled |
| Bill higher than expected | Unrestricted key being used by others | Add application + API restrictions immediately |
Ninety percent of issues boil down to two things: the right API isn't enabled, or restrictions are misconfigured. Check those first before you start debugging code.
Quick note for Android devs — your google maps api key goes in AndroidManifest.xml as a <meta-data> tag. This trips up a surprising number of people. Reddit's r/androiddev has a 40+ comment thread just about this one issue.
When the Google Maps API Isn't Enough: Alternatives for Business Data
The API is fantastic for displaying maps, calculating routes, and converting addresses to coordinates. For that stuff, nothing really beats it.
But the moment you try to use it for large-scale business data extraction — pulling company info, building lead lists, doing competitive research — you slam into walls.
| Feature | Google Maps API | Scrap.io |
|---|---|---|
| Results per query | 120 max | Unlimited (country-scale) |
| Email addresses | Not available | Included |
| Phone numbers | Available | Included |
| Social media profiles | Not available | FB, IG, LinkedIn, etc. |
| Cost per 1,000 results | $32–$40 | Significantly lower |
| Coding required | Yes (API integration) | No |
| Website tech detection | Not available | Included |
120 results per query. That's a hard cap. No emails whatsoever. And $32 to $40 per thousand results through the Places API. If your job is to build a list of every plumber in Phoenix or every gym in Manchester, the API is the wrong tool for the job. Too slow, too limited, too expensive.
Scrap.io was built specifically for this. It pulls data from the same 200M+ Google Maps listings — but includes emails, phones, social profiles, and website technologies. No API key, no code.
The filtering is where it gets interesting. You can target businesses by rating, review count, price range, whether they have an email listed, which social platforms they're on, even what technology their website runs on.
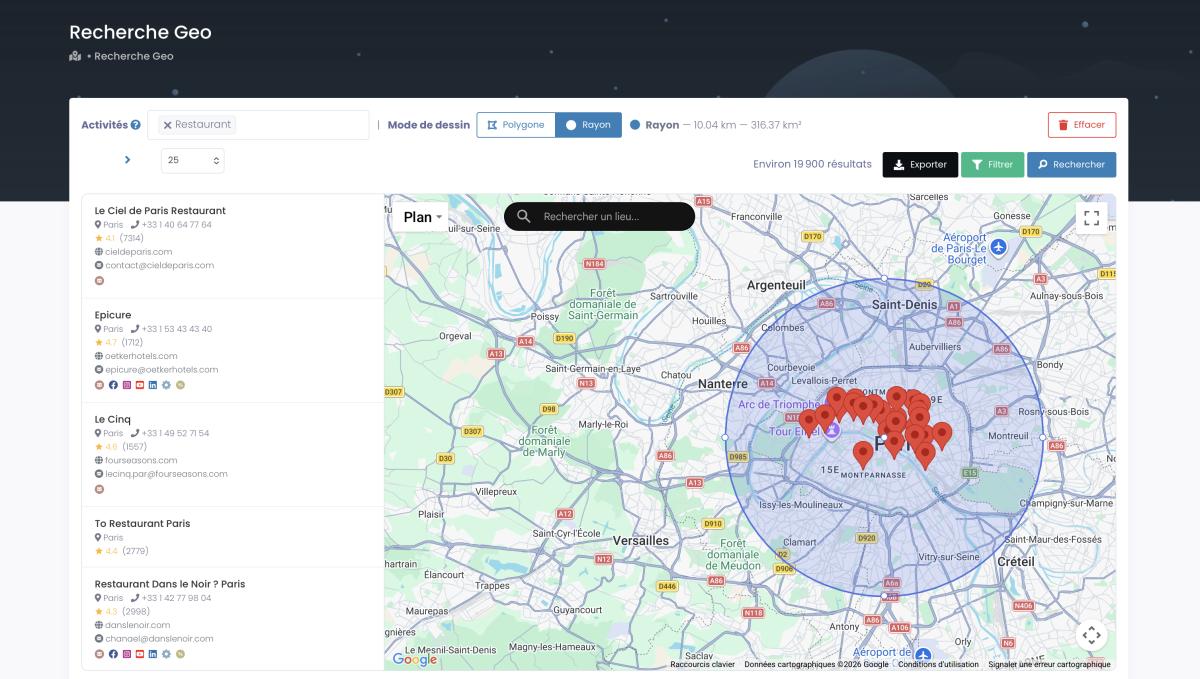
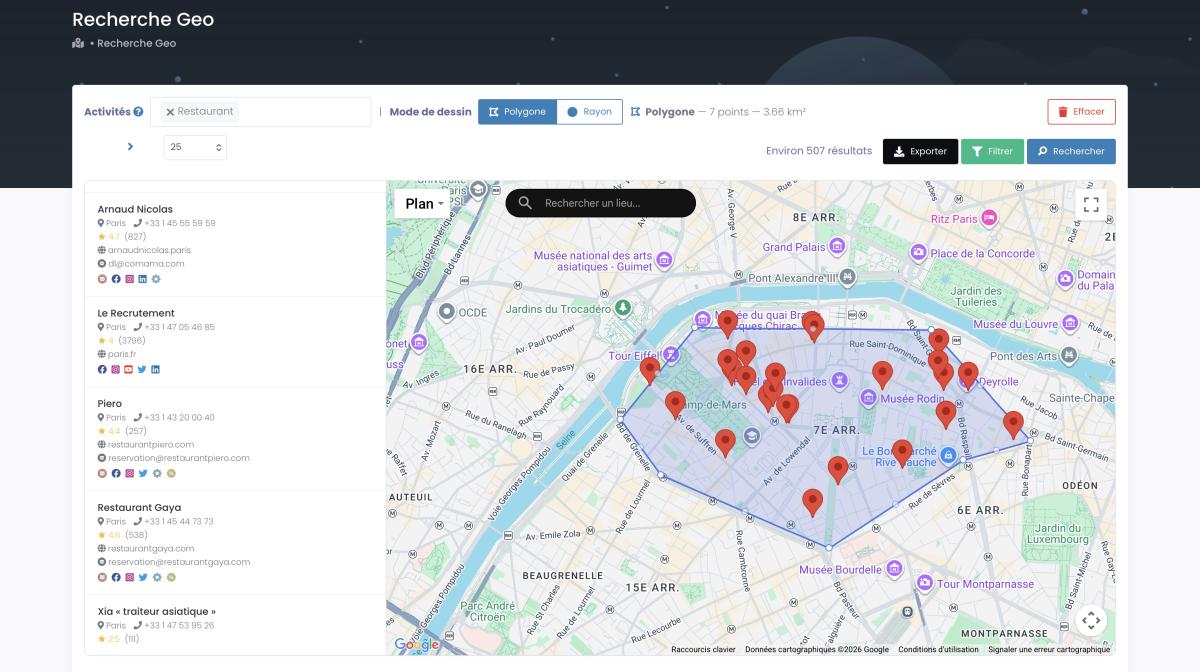
And for geo-targeting — Scrap.io supports both radius selection and custom polygon drawing. Way more precise than just typing a city name.
More on how this works in our guide to finding email addresses from Google Maps. And if you're wondering about the legal side — we've covered whether scraping Google Maps is allowed in depth.
Need business data from Google Maps at scale? Scrap.io extracts data from 200M+ establishments worldwide with advanced geo-selection (radius or polygon) — no API key required, no coding needed. Start with 100 free leads.
Integrating Google Maps API in Popular Frameworks
JavaScript / HTML
The classic. Drop this into any HTML page:
<!DOCTYPE html>
<html>
<head>
    <script src="https://maps.googleapis.com/maps/api/js?key=YOUR_API_KEY&callback=initMap" async defer></script>
    <script>
        function initMap() {
            const map = new google.maps.Map(document.getElementById('map'), {
                center: { lat: 40.7128, lng: -74.0060 },
                zoom: 12
            });
        }
    </script>
</head>
<body>
    <div id="map" style="height: 400px; width: 100%;"></div>
</body>
</html>
Swap YOUR_API_KEY for your actual key and you've got a working map. For more advanced stuff — geocoding, Places search, directions — our guide on extracting data from Google Maps with JavaScript API goes much further.
Python
Works well for server-side geocoding and batch API calls:
import requests

api_key = "YOUR_API_KEY"
address = "1600 Amphitheatre Parkway, Mountain View, CA"
url = f"https://maps.googleapis.com/maps/api/geocode/json?address={address}&key={api_key}"

response = requests.get(url)
data = response.json()
print(data['results'][0]['geometry']['location'])
For extracting coordinates at scale, the Google Maps coordinates guide walks through automated approaches.
Flutter / Android
Add google_maps_flutter to your pubspec.yaml, set the key in your Android manifest (<meta-data> tag) and iOS AppDelegate. The package documentation on pub.dev covers platform-specific setup. For Android specifically, don't forget the manifest entry — as mentioned in the troubleshooting section, it's a common stumbling block.
WordPress
Several plugins handle this without writing code: WP Google Maps, Maps Widget for Google Maps, and a few others. Paste your API key in the plugin settings and you're done. Fastest path to a store locator page, honestly.
Also relevant if you're doing research from your browser: Google Maps scraper Chrome extensions covers the free tools available.
Frequently Asked Questions
How do I get a Google Maps API key?
Go to console.cloud.google.com. Create a project, enable the Maps APIs you need, link a billing account, then go to APIs & Services > Credentials and hit "Create Credentials > API key." Takes under 10 minutes. Restrict the key right away — don't wait.
Is Google Maps API free?
Partly. Every API has a monthly free tier: 10,000 calls for Essentials, 5,000 for Pro, 1,000 for Enterprise SKUs. Maps Embed API and mobile SDKs are entirely free with no limits. You do need billing enabled, but you won't get charged if you stay within the free thresholds.
How much does it cost to get a Google Maps API key?
Creating the key costs nothing. You pay for API usage above the free tier. Dynamic Maps: $7 per 1,000 loads. Geocoding: $5 per 1,000. Places API: $3 to $17 per 1,000 depending on the data requested. Google provides a pricing calculator to estimate your specific bill.
Should the Google Maps API key be public?
Not without restrictions. The Maps JavaScript API does require a key in client-side code — that's unavoidable. But always set HTTP referrer restrictions and limit the key to only the APIs you use. An unrestricted public key is an invitation for abuse. You'll get someone else's bill.
How to use Google Maps API key for free?
Keep usage below the free tier per SKU. For most small business websites, the Maps Embed API (unlimited, free) or the 10,000 monthly Dynamic Maps loads under Essentials is plenty. Monitor your usage in the Google Cloud Console dashboard to avoid surprises.
What is the free alternative to Google Maps API?
OpenStreetMap is open-source and free. Leaflet.js works with OSM tiles at zero cost for frontend maps. For geocoding, OpenCage gives 2,500 free daily requests. None of these match Google on accuracy or global coverage, but they work for budget projects. For business data extraction specifically, Scrap.io offers Google Maps data at a fraction of the API price.
Is it legal to scrape Google Maps data?
Scraping public business data is generally legal. The Ninth Circuit's decision in HiQ v. LinkedIn established that accessing publicly available data doesn't violate federal computer fraud laws. Google's Terms of Service do prohibit it — but ToS violations are contractual disputes, not crimes. Full breakdown in our guide on Google Maps scraping legality.
What is Google Maps API used for?
Everything from a simple map on a contact page to a full ride-hailing app backend. Store locators, delivery routing, address validation, geocoding, real estate listings, fleet tracking, competitive research, lead generation. Over 5 million apps use it — and 74% of Google Maps users are small businesses (LoopEx Digital, 2026).
Wrapping Up
Getting a Google Maps API key is a 10-minute job. Figuring out what it costs in 2026? That takes a bit more work, mostly because Google made the pricing harder to parse when they killed the $200 credit.
Short version: create a GCP project, enable only what you need, set up billing, generate your key, restrict it immediately. The per-SKU free tier covers most small sites. For anything involving business data at scale, the API's 120-result cap and missing email data make it the wrong tool — that's where purpose-built alternatives come in.
Try Scrap.io free for 7 days — get 100 verified business leads from Google Maps instantly, with email addresses the API can't provide.
Last updated: March 2026 — Written by Sébastien
Ready to generate leads from Google Maps?
Try Scrap.io for free for 7 days.